
In late 2015, I joined the book community on instagram (“bookstagram”) as a means of spreading the word about blog posts and other content I created for different platforms. And for over 3 years after that, I struggled to grow my account to a level where it would actually help this blog and my book promoting endeavors.
By the time late 2018 rolled around, I was fed up with putting in a ton of work for a platform that was more a chore than enjoyable. I decided to put in one last push to get my account off the ground and if it failed, I’d leave it. And in 6 months I jumped from 3,000 followers to over 10,000.
So I thought I’d share what I did!
Disclaimer (Please Read!)
This is NOT a guide on how to become instagram famous. Nor is it the big secret on how to go viral (if I knew what that was I doubt I’d still be running a blog). And from my own perspective, I don’t think of bookstagram as a place where the likes and followers are all that matter. I love the community there and interacting with people, but it’s also a platform that does take a bit of work and it can be really discouraging if you’re putting in the effort and not seeing any change. I’ve been there and it sucks. And breaking out is a combination of effort and luck.
Not everything I talk about will likely apply to you. Its purpose is to 1) share some of my methods in case someone else finds them helpful; and 2) provide an in-depth behind-the-scenes look at a bookstagram account because that’s exactly what I wish I could have found when I was starting to work on my own account.
AFFILIATE LINKS: Please note that this post contains affiliate links to Amazon. I have included these in case there is anything you’re interested in checking out, and I will earn a small commission (at no additional cost to you) for any purchases made through them that goes toward supporting the blog.
Taking & Editing bookstagram Photos
Brainstorming a Photo Concept
The core of instagram is photography so when I started thinking about how to improve my account, that is where I started.
Every photo begins with an idea. I often find it fits into one of these categories:
- a book or books I want to feature (current reads, on my TBR, new book mail, etc.)
- a photo layout
- a prompt for a photo challenge or book box
- a post for a shop I rep for
- a specific caption topic
- and whatever else comes to mind!
This idea is the starting point for creating my photo. Once I have a concept, I start filling in the blanks because, while the photo is important on instagram, you want to engage readers with your caption too.
NK Tip:
If you find that you’re running out of ideas, keep a notebook or online record of ideas when you are inspired to fall back on. I do this for both photo ideas as well as possible captions so that I don’t get stuck when I’m creatively burned out.
One of the most common questions I get asked is how do you decide what to post? and my only answer to that is it depends on the day! I use weekly hashtags for most of my daily posts, and try to post at least one other time as more of a “freebie.”
NK’s Favorite Weekly Hashtags:
- Sunday - #SundayERead (started by me)
- Talk about eBooks!
- Monday - #MapMonday (not sure who started this one)
- share a (book) map!
- Tuesday - #OnMyTBRTuesday (started by me)
- talk about books on your TBR!
- Wednesday - #AudiobookWednesday (started by me)
- share your latest audiobook reads or purchases
- Thursday - #BeatTheBacklist + the monthly tag (tag and reading challenge started by me)
- post your backlist books for the weekly photo prompt that goes with the Beat the Backlist Reading Challenge
- Friday - #PintasticFriday (started by @sammaybereading and @trissinalovesbooks)
- follow the weekly prompts and share your enamel pins!
- Saturday - #StackingUpSaturday (started by @book_junkee)
- share a book stack!
Planning Your Content
You don’t have to plan out your feed’s content if that doesn’t suit your style but it’s something I personally do. . . to an extent. There are benefits to planning out your feed, even somewhat vaguely. Reasons might include (but aren’t limited to):
- (Monthly/weekly) photo challenges. If you’re doing a bookstagram challenge then it helps to keep track of the prompts you plan to do each day.
- Blog/Bookstagram tour. If you’ve signed up for a promotional tour, make sure to get that on the calendar! Bookstagram tours mean you’re posting to instagram on an assigned day but even if you’re doing a blog tour, you can post on instagram to tell everyone to check out your blog for the post!
- You rep for a (bookish) company/shop. If you’re a rep for a shop and have obligations to fulfill (ex. 4 posts a month) then you want to make sure you’re meeting those. Tracking when you’re posting can help keep you on top of things.
- Book releases. If you like to share newly released books, add those to your calendar so you don’t forget!
- Weekly hashtags. Are you a fan of #MapMonday or one of the many weekly tags out there? Get it on your calendar!
But what I found the most useful? I plan out my feed visually. Meaning I’ll take my photos and plan them out in the app Preview (more on that later) so that I don’t have 2 flatlays next to each other, for example, or 2 stack photos back to back. I look at my feed in terms of both the rows and columns and try to vary my photo styles. Depending on your photo layout preference, that may or may not work for you.
When I started planning my feed based on photo layout was when I started seeing a bigger difference in growth on my account. Potential new followers who look at your profile page will see your feed as a whole, not as a single photo. By varying your layout (when applicable), you’re providing a more interesting visual overall.
Choosing Your Book(s)
Alright, you have your idea. At this point I also look at my feed and the books I’m featuring. One of my personal goals for my account is to feature more under-hyped titles. Unfortunately, with a smaller account, those posts tend to not do as well as posting about a book that’s popular in the community.
I won’t go into detail here but I employ a few strategies that boost lesser known titles and authors to a wider audience, and so far it’s been a success!
When it comes down to it, bookstagram is just instagram with books. It’s the commonality across all bookstagram accounts and, to me, that makes picking a book to photograph an important part of forming a more solid concept.
Why you might pick a book:
- You love it. It’s always good to show your support for your favorite books and authors. A great way to do that is show off their books in your photos!
- It has a pretty cover. Admit it. You probably judged a book by its cover a time or two (or three…). A beautiful cover can catch the eye and makes photographing it all the more fun.
- To start a discussion. Maybe you want to talk about certain elements of a book. A great way to start it is by using that book in your photo.
- Currently reading. This is a great option for choosing a book. Talk about what you’re reading right now!
But I do want to make a few things clear:
You don’t need physical books to be a bookstagrammer. Share what you’re reading on your eReader or eBook app! Listening to an audiobook? Show us!
You don’t need to own physical books to be a bookstagrammer. Did you borrow books from the library recently? Show them off! How about a loan from a friend? Those work too!
You don’t need to own e-books to be a bookstagrammer. Again, library books are your friend. But so are book covers! Grab the image online and share it on your phone or eReader!
Don’t feel limited because you don’t own brand new hardcovers. I think there’s a level of privilege that comes with having a large book collection on-hand and it’s not something that many people have access to, despite how bookstagram may appear on the outside. You shouldn’t feel limited or disconnected from the community because of that. If you read, then you have books or access to them in SOME form. The source doesn’t matter. The format doesn’t matter. If you want to have a bookstagram, do it!
NK Tip:
If you don’t have the book you want to share and are having issues with glare on your eReader screen or phone, you can use a photo editing program to photoshop an image of the cover into your photo. My favorite program for this is GIMP (it’s free!) but I’ve also seen recommendations for Pixlr (online program) and I’ve used Canva a time or two in a pinch.
Setting Up Your Photo
When you start setting up your photo, there are a couple things you may want to consider:
- If you’re thinking about having a theme/aesthetic for your bookstagram, this is a good time to start considering what that will look like. This may be as simple as including the same prop in each picture, or using the same filter for editing, the same backdrop, etc. The key is consistency.
- Having a theme doesn’t mean you’re stuck with it forever either so play around and find what works for you!
- It may not be what you want to hear, but I’ve found that if the photo isn’t good, none of the rest of the stuff matters. Granted, what is considered “good” is subjective but speaking more generally, you want clear photos where the subject matter is the focus (the book, merch, etc). For people who’ve been following you for longer, the photo may not be as important but for new followers, that may be all the see so you want something that catches the eye and/or is aesthetically pleasing.
The Background
The background of your photo can give your feed a cohesive look (if you choose). What you put behind the book and other props can determine if they’ll contrast against it or blend in. And you may have multiple backgrounds.
Types of Backgrounds
A photo background can be anything from your floor to a sheet to a piece of furniture. Reading in the park? There’s a backdrop right there. At a coffee shop? Snap a pic! Your background is whatever you want it to be.
If it’s something that can’t be moved (like the floor), pick a spot with decent natural lighting (I’ll get to that in a bit). If you can move your backdrop, then again, think about the lighting.
Backdrops on a Budget
Bookstagram is great but you don’t need to spend money to get pretty pictures. If you don’t have anything in your house (or don’t like anything) for your pictures, you have a few options that won’t break the bank:
- Poster/foam board. Head on over to your local dollar store or the craft section at stores like Wal-Mart and I bet you can find a piece of poster board or foam board for no more than a few dollars. These make great white (or solid colored) backgrounds but can also help to bounce light (white).
- Craft signs/wood panels. Again, that craft section is your friend (though it may depend on the store). These are smaller wood boards already attached and generally either square or rectangular in shape. They’re perfect if you want a more rustic feel as well as something that you can move around easily.
- Make your own! If you have old wood boards lying around your house (I dug up a few in our basement) you can make your own background!
- Vinyl floor panels + Photography backdrops. You may be aware that professional photographers have fake backgrounds that they use in their studios and now you can too! There are places online that sell smaller backdrops with all different textures and colors that are better suited to smaller scale photography like bookstagram! I’ve bought from Mini Backdrops in the past and was also recommended Swanky Prints for these!
- Blankets & sheets. Your blanket, quilt, or sheet can be perfect for pictures. You can pull it taut or give it that rumpled look and you’re good to go. The best part is that if you don’t have the color you want, you can buy something that fits your bed so that you can use for more than just photos!
- Nature. Step outside! Anything from the grass to a tree or a particularly nice bush can be the perfect background. Even better, it’s completely free!
NK’s Backgrounds
I’ve used a few different backgrounds in the past, including the small vinyl photo backdrops, blankets, etc. Currently, I use:
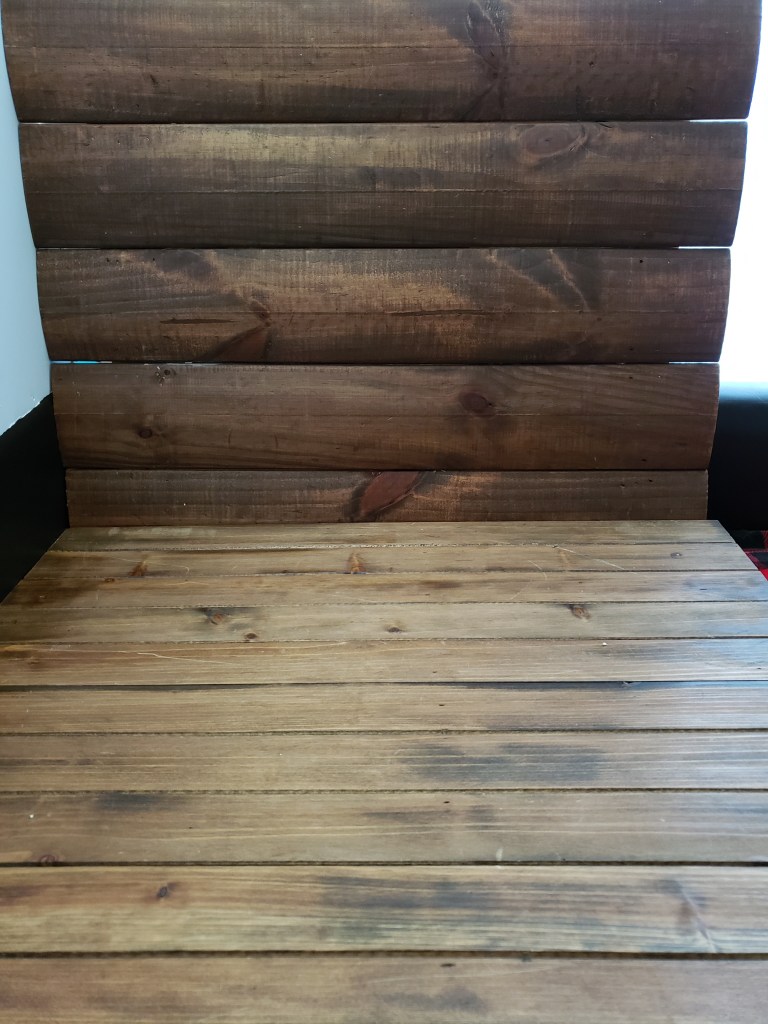
- Wood board (#1): made up of old 2 X 4s we had in the basement, nailed together and stained with leftover stuff I found in my garage (cost: $0).
- Wood board (#2): 2 plaque boards from Michael’s nailed together and stained like the first one (cost: approx. $15 USD with coupon)
Lighting
Your lighting can make a HUGE difference in the quality of your photo and how much editing you need to get THE photo that you’re going for.
Natural Light
Whenever possible, use natural light over artificial. Ceiling lights and lamps can cast unwanted shadows and also give your photo a yellow-tinged color (depending on the light bulbs you use). Using your camera flash can also change your picture because of where the light hits. If you can use natural light, do so.
But not every time of day is great for taking pictures. It depends on where the light is coming from through your window (if you’re inside). I’ve found the best times of day tend to be either early morning or late afternoon/evening.
ARTIFICIAL LIGHT
When natural light isn’t possible, you’ll likely be working with artificial light and that isn’t a bad thing. You can simulate natural light with bright white or daylight bulbs. They can mimic natural light but can often be harsh. Once they’ve heated up (usually takes a couple minutes for LEDs) and are at max brightness, I diffuse the light by propping a white poster board along the side of my photo set to “block” the light. It evens it out where my photo will be taken. You can also use a white sheet or gauzy fabric if you wanted to soften it.
NK’s Light Set-Up
I rely on a few things for my photos. Because I often take them after it’s dark because of my work schedule, I use artificial light almost exclusively for my feed. This is achieved with:
- 3-bulb flexible floor lamp: something I already had (similar to this lamp but only 3 lights), with bright white light bulbs installed to simulate natural light (cost: approx. $13 USD for 2-3 bulbs)
- White tri-fold poster board: bought at Wal-Mart in the school supplies section. I recommend a tri-fold over just a piece of poster board because you can stand it up on its own and use it to bounce light. (cost: $2 USD)
When I’m able to take photos with natural light (usually only on the weekends), I prop my wood boards up so that they’re open to the window on one side. On the other side, I prop the white poster board along the side to reflect light and even out the shadows.
Window is on the left (below) with the white poster board bouncing more light onto the wood boards to create a more even lighting set-up.
The majority of the time, I’m using artificial light. I set up my boards near my lamp and put the white poster board on the side closest to the light to diffuse it a bit and even things out on my photo set.
The tri-fold poster board (left) stands up mostly on its own on the edge of my bed, both along the side and the corner. Behind it is my floor lamp with the bright white bulbs. You can see that the actual bulbs are completely concealed behind the board, but (primarily at night) you get enough light and no harsh shadows on the photo space (wood boards, right).
This set-up generally requires a bit more editing to increase the brightness but little else beyond that.
Props
Oh yes, the props. While bookstagram may be about the books, props tend to get a lot of attention too. Deciding if you want props or not, what to use, where to get them, there are so many options!
First: do you need props? Absolutely not! Don’t worry about what everyone else is doing. If you like props, use props! If you don’t like props, don’t use props! It’s that simple.
I think there’s an idea that you need to have certain kinds of props to have a pretty picture which is simply not true. I see gorgeous minimalist photos all the time, pictures with nature backgrounds that let the book speak for itself. You don’t need props. But don’t feel bad about using them either. It’s all up to you.
Choosing Props
By now you’ve figured out the book and the background of your picture. Prop selection is similar in that you might want to consider the book or your theme if you have one. If you’re struggling to think of the kinds of props you want to use, consider:
- Colors. Keep to the basics. What colors are in your book cover art? Or your background? What colors do you want to show off?
- Book-related. Are there items that remind you of the book? Use them! They don’t have to be perfect but don’t ignore that gut feeling that that prop makes you think of your chosen book.
- I like the way it looks. See something that just looks cool? Grab it and put it in your picture!
This is the perfect time to use any of that book swag you might have for a certain title!
Where to Find Props
Around the House
Start with what’s nearby. Raid your house for anything you like or think would look good. I recommend looking through storage stuff as well. You never know what you’re going to find. Anything from a cup in the cupboard to a plate or decorative bowl in the kitchen, maybe a throw blanket or little decorative figure, what you have on hand is going to be your best bet starting off.
You don’t need to buy bookstagram props.
- Bookmarks & Book Swag: Did you ever consider using your bookmark as a prop? No? Perfect time to start! Bookmarks offer a personal touch because it’s what you’re using to mark your place in a story. Whether it’s an actual bookmark, a napkin, a scrap of paper, whatever it may be, talk about it! Have any bookish swag lying around, maybe from a subscription box or pre-order incentive? Maybe something you’ve made yourself? Show it off!
- Other Books: Who said you only need to use just one book? Other books can be great accents to help make your feature book shine! Build a throne of books, make a stack, you’re only limited by your imagination.
- Mugs/Cups: Check your cupboard! I bet you have SOMETHING that you use for drinks. Snap a photo with your morning coffee or tea.
- Office Supplies: A stapler and paperclips really gives it the whole back-to-school vibe, right? Rock it! Grab a notebook and throw it in. Colored pencils and pens add a nice accent.
- Clothes: Sweaters and fun t-shirts make great props (as well as backdrops). Show off your favorite sweatshirt or even a pair of jeans. And don’t forget socks for #SockSunday!
- Toys: Have a sibling? Know your old toys are boxed up in a closet somewhere? Time to dig them out! They can add the perfect level of whimsy.
- Plants: Add a touch of green with a leafy potted plant or find a few flowers for a splash of color! Plants can go with just about any book and will always look great!
- Candles: Have a few candles lying around? They don’t have to be “bookish” candles, you know. Any candle will do. Light it up or leave it cold!
- Jewelry: Add a little bling to your bookish photo! Jewelry adds that extra sparkle to catch the eye.
- Yourself! YOU can be a prop. Hide behind a book, show off your latest pair of fun socks, stir a cup of tea, get creative!
Nature
Head on outside and you never know what you’ll find! Take advantage of a park bench or a porch swing. Find a cool rock? Prop a book on it and snap away! Nature can be a great place to find inspiration as well as offers all sorts of interesting pictures for the taking. Use it to your advantage! It’s free, after all!
But I Want to Buy Props!
No worries, if you want to buy specific props for your bookstagram pictures, let’s be smart about it. Hit up your local Dollar Store for little decorations, fake flowers, colored candles, and whatever else you come across. Goodwill and other similar stores are also great for finding all sorts of prop potential. You can even check out garage/yard sales when you hear about them because there’s a treasure trove of stuff out there you could use. Craft stores also are great resources but can be expensive so watch for sales, especially after certain holidays when the decorations are marked down.
Things to consider:
Pick props that you can use with multiple books. Don’t buy something to use with just one picture or it’s a waste of money for you.
Choose props that are functional. Even if that function is as a decoration, I highly recommend buying items that double as something else so your money is put to good use.
DON’T STRESS. Props are not the end-all of bookstagramming and you don’t even need them! So don’t worry about whether you have the “right” prop or not.
Shopping Online
When I’m not shopping in-store for props, I usually use Amazon or Wish (it’s cheaper but you may have to wait a while for your order to arrive).
Specifically, I use the EXPLORE page on Amazon to find fun stuff and make idea lists from there. You can find my general bookstagram list and fantasy prop list below that came from those pages!
Once you start using it, you’ll get recommendations in your EXPLORE feed of items similar to other products you’ve liked which can be fun to look through!
NK’s Props
I have a few staples that I use in many of my photos so I tend to keep those all in one place in my room. These get moved to the bed next to my photo set so they’re on hand regardless of whether I use them or not. Sometimes inspiration strikes so I like to have them ready! Some of my favorite props include:
- Old lace table cover. I found this in storage, leftover from some former decoration in our house.
- Faux fur sheepskin “rug.” Bought this on Amazon and it doubles as decor over a chair.
- A white sheet. I bought a sheet set super cheap that also happens to fit my bed. The top sheet works great in the background.
- Wood tray. Another purchase, partially for photos, also because I like eating in bed.
- Fake flowers. I’ve collected these over the last year from dollar store purchases and Wal-Mart/Michael’s sales. They also serve as general decoration in my room.
- Daggers. Okay so I totally bought my 2 daggers for photos but I love using them and they look pretty cool on my bookshelves too! (Here’s Dagger #1 and Dagger #2)
- Book merch. Any kind of bookish merch works great as a prop! Whether you’re buying from a small shop or getting it in a book box, from a pre-order incentive, or whatever the source may be, take advantage of it!
More recently, I made a change to my photo theme so I’ve added some new natural history/science-type props into the mix:
- Skulls. Because I find them cool. I have a degree in wildlife science. Skulls are a thing. Mine are from Oddities Haus.
- Rocks and minerals. Lots of different colors to match any sort of photo. I also like rocks and used to collect them so getting back to that has been great. In particular, I bought a mix set to provide different color options.
- Natural curio. Anything from bones (naturally and humanely sourced, I always check) to moss and small plants. Most of these have been found or purchased from Oddities Haus and Of Moth and Moon.
Creating Your Layout
Once you have all your photo pieces together, your lighting is set, your backdrop’s ready, it’s time to start setting everything up. When you start setting up your photo, consider:
What is your focus? What book or item do you want viewers to be drawn to. Or maybe it’s multiple things. How will you make that thing the focus of your photo?
What kind of layout are you trying to accomplish? Do you want to do a flat lay (taking the photo from a bird’s eye view)? Or maybe a photo where everything is at an angle? Maybe you want to do a photo from the front. There are a lot of options and don’t be afraid to change it up.
What sort of photo do you want to take? Are you trying to create a minimalist look? Or offer all sorts of different things to look at in a single photo? Maybe something in between? This will play a part when you start placing your book and any props you want to include.
Layouts
A few common layouts include:
Flatlay/Bird’s eye view (left). This is a photo taken from above.
At an angle (center). These photos have the most variation and generally include any photo not take from above or straight on.
Front view (right). Photos where you’re looking straight on at your photo setup.
This step is the hardest to talk about because often there’s no rhyme or reason to how I set up my photos. I have an idea based on the book or what I want to talk about and just go from there. For example, the front view photo on the right (above) is a stack of 2019 releases I want to read but haven’t gotten to yet. I had the idea for the caption first and decided it made sense to put multiple books in the picture which is easiest to do as a stack. And there’s the photo I posted!
You have to experiment with photo layouts to find the right one. But if you’re getting stuck, my recommendation is to look at some of your favorite accounts. What are they doing that you like so much? Try to do a similar layout and see what you think. Remember to always credit the original account if you copy their layout style.
Taking the Photo
Now that you have all your photo supplies ready, book(s) included, it’s time to actually take the photo!
The Camera
You don’t need a fancy camera to rock your bookstagram (but you DO need a camera of some kind as well as a smartphone capable of using the instagram app).
Phone Camera
Your phone camera can work wonderfully for snapping great pictures. Before you go to take a picture:
- Clean your camera lens and screen. It’s so easy to smudge up your phone camera so clean it off beforehand to get the clearest picture you can.
- Check your settings. If your phone has the option to change the size and quality of your photo, pick the highest settings you can. This means the highest MP value (refers to mega pixels where higher = bigger image). A larger image is going to come out looking better at different sizes compared to a lower MP picture.
- Turn your grid on. Again, depends on your phone’s options but turning on the grid can help you easily line up your photos so that you get the angle you want.
- Change the photo size ratio. If you can, an easy way to ensure your whole photo will fit in the square photo shape of Instagram’s normal format is to change your photo ratio to 1:1 if that option is available. If not, 4:3 can also work well to get close.
The nice thing with using your phone camera is that the picture is already on your phone ready to go. You don’t have to transfer it over.
Digital Camera
Another option is a DSLR camera or something similar. It likely has a higher MP than your smartphone as well as a lot of other options beyond the simple touch-and-capture. These can be great advantages for taking great instagram photos. A few things to consider when using a DSLR:
- Aperture. In basic terms, this is how you can get those really focused shots on a single object. When you increase the aperture it closes the lens which makes the camera hone in on whichever object you’ve chosen. Alternatively, a lower aperture gives it more to focus on and a less blurred background (this also increases the light allowed into the shot).
- Shutter speed. This will change depending on your lighting and if you’re trying to capture an action shot. You can use a lower speed for book photography though I recommend using a tripod or setting your camera up somewhere it won’t shake so your picture isn’t blurry. A higher shutter speed is great for bright lighting or action shots.
- ISO. How much light do you want in your photo? Higher ISO = more light, lower ISO = less light. Great if you don’t have the best lighting.
To be honest, when I use my DSLR I tend to mainly focus on the ISO which is an easy setting on my camera. It will differ with brands and models so I recommend reading your camera’s manual and Googling tricks for your specific model.
With a DSLR or other camera that isn’t your phone, you’ll need to somehow transfer your picture to your phone in order to post it. When I’m not scheduling photos I use Google Photos (synced to my phone) or email to do this, usually, or you can connect your phone to your computer and drag them over.
Another option is to use a card reader like this one. You can remove your memory card from your camera and plug it straight into the reader, then plug the reader into your phone. You’re then able to access all your photos and edit them directly using your phone.
Getting the Perfect Photo
Why the Photo Matters
With bookstagram, I’ve found that you have 3 primary focuses with a post:
- the photo (is it aesthetically pleasing to look at, does it catch your attention, etc.)
- the book(s) included in the photo (what they are, how popular they are, etc.)
- the caption (are people engaging with your content, taking something away from it, etc.)
The photo is the most important part of all of that (with the books a close second). Why, you may ask?
Readers see the photo first before anything else. If we assume that everyone has the same following, a pretty photo can allow you to post just about any book. A popular book is more likely to do better, yes, but you can still have a strong post with an underhyped title. And no one is going to click through to the caption if they’re not intrigued by the photo first.
Again, this is making the assumption that the person viewing your content is a potential follower so they may not know what your content (photo/caption) quality is beyond that one photo.
And unfortunately, instagram is a highly visual platform. I wish I could say that the books matter more, that what you’re sharing matters more, but generally not so much if you’re growing your account. It doesn’t mean they are unimportant though.
I look at my instagram like this. The more people who follow me and engage with my content, the more people I can share my favorite books with. Because that’s what I use my platform for as a blogger, a bookstagrammer, and a reader. I share the books I love. And it sucks to not have your voice heard on a platform you put time into. So you play the instagram game, posting photos people want to look at, then WHAM! you hit them with some awesome book recs and hope they discover new favorite reads.
Increase the chances of a good photo
Learn the settings on your camera whether it’s your phone or a physical camera. The more you can do with the initial photo, the less editing you need to do later on.
Practice! No, seriously. People joke about having a camera roll filled with shots of the same scene to get THE photo, and it totally happens. You have to practice your photography in order to improve it. Even if you watch all the tutorial videos and read all the tips and tricks, you still just have to do it.
And with that, specifically let’s talk about focusing your shot. By this I mean placing the clear focus of your photo on either a particular item/section or the entire photo. On phones, you usually tap the place where you want the camera to focus on. With a DSLR you likely have automatic and manual focus that you can play with.
Blurry photos = lower engagement
It’s okay to have SOME of the photo blurred, especially if you’re doing a close-up shot. That’s part of the photo. But when your entire photo is blurry, it’s not going to draw the eye. I also don’t recommend manually blurring your photo unless you are familiar with doing so.
Editing Your Photo
There are a LOT of different editing apps and programs you can use on your photos, but I’m not going to talk about them all (I’m not even sure I know all of them). Below are ones that I currently use and can talk a bit about.
Editing Apps & Programs
Snapseed
This is a great app for touch-ups when you need to adjust the exposure, saturation, etc. of just part of your photo instead of the whole shot. There are several different settings as well as pre-set curves that you can adjust to give your photo the look you want.
Using the BRUSH feature makes it easy to alter small parts of your photo, ease the shadows a bit and increase/decrease saturation. The curves help lighten or darken your image, balance the colors, etc. There are plenty of features, you just need to play with them to achieve what YOU want.
A Color Story
This might be my favorite editing app to-date. You have the option to save multiple custom edits so you can create a “recipe” of edits (exposure, filters, etc) that achieves the look you want and save it. That way you can use the same editing style for all your photos. Additionally, you can do any cropping or other adjustments in the app. There are also built-in filters that you can mix and match, some free, some require a one-time purchase.
GIMP
Desktop (Website)
When I use my DSLR camera, I like to edit my photos in GIMP before putting them on my phone. GIMP works like Photoshop (except it’s free) and offers the same general settings. It’s very easy to adjust the lighting and contrast, and whatever else you choose to change.
GIMP isn’t specifically made for editing photos so while it does work well, if you’re not familiar with using it, you may want to use the mobile apps instead as they’re more geared for photo editing.
Other Options
These are obviously only a few of the options out there. Others to check out include:
- VSCO (Android & iOS)
- Adobe Lightroom (Desktop, Android, iOS)
- Adobe Photoshop (Desktop)
Designing Your Feed
Once you start taking more photos, you may want to consider planning your feed out beyond individual posts. As I mentioned earlier, potential followers looking at your profile will see your photos in the grid, so it’s helpful to consider not only what your individual posts look like but how they look all together.
Planning Your Feed
I don’t mean that you need to have all your photos taken a week or month in advance. In fact, I usually only do 3 photos at a time the night before. What I’m referring to is looking at your feed and posting your photos in an order that gives your overall home page a more cohesive feel (rather than posting 3 photos with the same layout back-to-back then suddenly switching it up).
This is especially helpful if you’re testing out different layouts or editing styles and want to see if it flows with your other photos.
Secondary Private Account
One way to do this is to make a secondary instagram account that you set to private so you can upload your photos there first to make sure they work with your others (which you would also need to upload).
I’ve tried this method and while it didn’t work for me because it was more of a hassle than anything, I know of several people who really like doing it this way.
Apps
There are a number of phone apps out there that will let you preview your drafted posts with the rest of your feed and they can be a great option so you can view everything together AND schedule your post ahead of time if you choose (examples: Later; Plann)
 My personal favorite is PREVIEW which I mentioned briefly before. This app allows you to upload your photos into a mock feed and brings in all your instagram photos live. You can drag and drop your drafts to put them in whatever order you’d like. In addition, you can save hashtag bundles if you use the same tags over and over, and it will also tell you if you’ve gone over the tag limit (30 max) in your caption. Of all the apps I’ve tried, it’s probably my favorite. There’s also the option to schedule your posts out or you can simply post them whenever you want straight from the app. It will copy whatever caption you’ve written in the app and open instagram with your photo ready to go.
If you have any questions or parts of the guide you would like to see expanded, please leave a comment!

About Austine
I'm a 20-something research proposal developer with a background in the life sciences and education. Reviewer of books since 2011, amateur photographer by day, and aspiring author by night. I believe animals (and books) are better than people.
This was such an incredibly helpful post! THANK YOU! <3
Wow, this post is immense and totally incredible. Thank you so much for sharing! I’ve been feeling so over instagram lately because, like you said at the start, putting so much effort into it only to have zero or very little result is really disheartening and unmotivating. Knowing these tips (especially about working with little to no natural light!) is super helpful ?
Just starting out in book blogging and bookstagram. This post is immensely helpful. Thanks so much for sharing!